The bObsweep PetHair loves to clean the floors for you! Leave all your floors to the bObsweep PetHair and it will suck everything up. From dust and hair to dirt and fur, this robot vacuum gets it all. It maneuvers over any floor type and cleans it thoroughly. Whether on a carpet, wood, tiles or rugs, picking stuff up is its specialty. In this guide, we will have a thoroughly look at the bObsweep PetHair. Would you like to purchase this robot vacuum cleaner? Head over to Amazon and get yours today.
Upgraded Model: bObsweep Pet Hair Plus Robotic Vacuum Cleaner and Mop Review
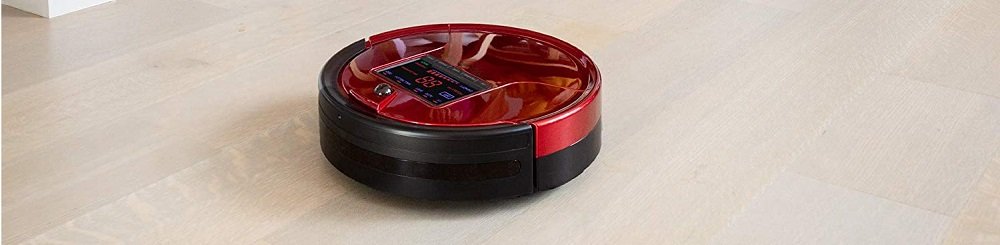
Introduction to the bObsweep PetHair
Your bObsweep PetHair is ready to take its first baby steps with just a little help from you. In your package, you will find everything you need to guide the bObsweep PetHair through its cleaning sessions. Each box contains:
Install the vacuum’s side brush and it will be able to sweep along corners, walls, and other hard to reach areas. To do this, flip the robot vacuum over onto a flat surface and use the head screwdriver to secure the side brush into its socket. Keep the remaining side brush for when the vacuum needs a spare.
Next, flip the bObsweep PetHair power switch to “On” and the vacuum will make a beeping sound. To give the bObsweep PetHair the energy it needs for a complete cycle, place the robot vacuum on its charging station until the battery is full and it displays the word “READY” on the screen.
Make sure the metal plates underneath the vacuum line up with the charging nodes on the station. If the battery is completely drained, the screen will not light up when you flip the power switch “On”. When this happens, you will need to charge the bObsweep PetHair by placing the adapter directly into the inlet above the power switch.
The bObsweep PetHair is now ready to clean! Press the “AUTO button” on the remote or the “PLAY/PAUSE button” on the cover and the robot vacuum will clean on the default setting, which is called Auto 1. In this mode, the vacuum will automatically vacuum, sweep, and mop your floors. Once the battery falls below 15%, it will search for its charging station by itself. If the robot vacuum has trouble finding its station, you may need to place it in a more open area with plenty of space around it.
As the bObsweep PetHair explores your home, make slight adjustments to areas where you see it having difficulty to maneuver. Don’t worry if the vacuum seems to favor one area over another; just give it time and the bObsweep PetHair will clean all areas of your home, without any additional help.
Features
– Self-Charging
– Programmable Schedule
– Remote Control
– HEPA Filtration
CheckUp Test
If bObsweep PetHair is not working as it normally does or is repeatedly running into a certain error, you may want to run a check up test to uncover the source of the issue. Hold down the bObsweep PetHair’s UV button while at the same time switching on the power. The bObsweep PetHair will emit a series of beeps to let you know it is in check up mode.
Step one: ground detecting sensors. The first step is to test the ground detecting sensors. When the robot is on the ground. The words “Dirt”, “Capacity”, “Min Cleaning” and “Charging” should be illuminated on a screen. When you lift the robot vacuum these 4 lights should disappear.
Step two: wall and optical sensors. Use a flat surface, such as a sheet of paper, to imitate a wall in front of the bObsweep PetHair. Drag the imitation wall from the left side of the bumper around to the right side. The 5 icons along the top of the screen “UV”, “AUTO”, “SPOT”, “WALL FOLLOW” and “DOG” should light up as you do this.
Step three: Charging System. To move on to the third step of the checkup test you have to press the UV button once. The screen will go blank. Place the robot about five inches of its charging station with the head sensor facing the station. The screen should display the number 77 now.
Step four: bumper sensors. To move on to the fourth step of the check up test you have to press the UV button once more. The screen remains blank. To test the bumper press down on its center, the words “dirt” and “min cleaning” should both light up on the screen. If you press down on the left side, only “dirt” will light up. If you press down on the right side only “min cleaning” will light up.
Step five: display screen. To enter the fifth step with a check up test press the UV button once more. The bObsweep PetHair will now test its display screen. Each of the screens icons should light up in a repeating rotation.
Step six: Brushed motors and vacuum suction. Once the light cycle finishes press the program button. Both the main and side brushes should spin and air should flow out of the back of the dustbin.
Step seven: wheels. The final step of the checkup checks the wheels. Press the mode button and the vacuum should drive forward. Flip the bObsweep PetHair over and you should see the UV lamp turned on. Press the mode button once more and the vacuum will drive backward and its UV lamp will turn off.
If the bObsweep PetHair produces the result as described then there is no need to worry. If the robot vacuum cleaner does not perform as it should during the check up test you have to contact the bObsweep customer care center for further assistance.
Cleaning Speed
The robot vacuum cleaner has 2 cleaning speeds. The robot will take its time cleaning your floors on slow speed. This mode is ideal for when you would like the vacuum to intensively clean a small area. With normal speed, the bObsweep PetHair will work quicker and cover more areas of your house. This mode is efficient at cleaning large areas. To adjust the vacuum cleaning speed, simply press the “Speed” button on the remote and swipe through the different speed levels.
UV Light
Besides vacuuming, the bObsweep PetHair robot vacuum also zaps microscopic bacteria with the sterilizing UV light underneath the vacuum. bObsweep PetHair’s UV light is “On” by default. To turn it “Off” you have to press the “UV button” on bObsweep PetHair’s cover or remote.
The UV light will turn “On” only when the vacuum is working, and will automatically turn “Off” when the robot has done its job. You cannot turn the UV light “On” while the robot is not moving. For your personal safety, do not stare directly into the UV light when you flip the vacuum upside-down.
Cleaning the bObsweep PetHair
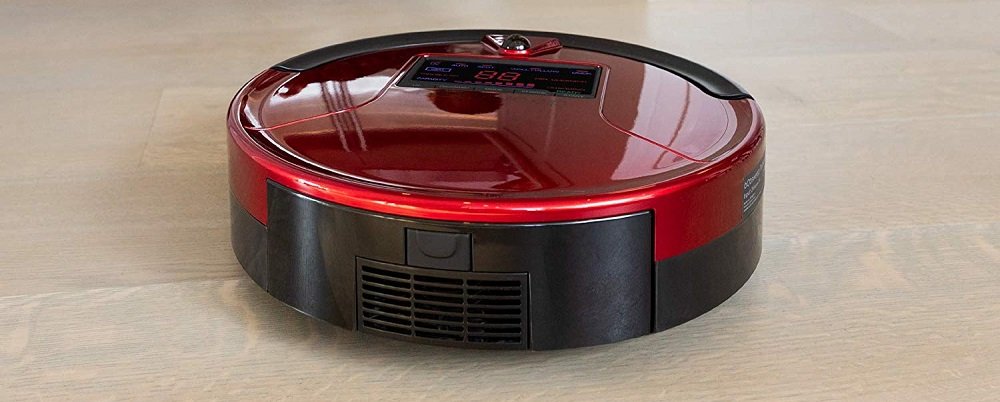
To maximize efficiency, it is best to clean out the robot’s dustbin, filters and brushes about once a week. To empty the dustbin, press the small button on the back and the dustbin will pop out. Pull down the transparent door on the bin and empty the dirt and debris.
The filters are located on the top of the dustbin. Pull the filters out and dust them off using the cleaning tool which comes with the vacuum. When done, place the thinner electrostatic filter on top of the thicker HEPA filter, and replace the filter frame back in its place on the top of the dustbin. Lastly, slide the dustbin back into the vacuum.
When long hairs wrap around the brushes or clog to the ends of the main brush, it can reduce the robot’s performance. To clean the brushes, use a screwdriver to remove the screw securing the main brush. Lift the main brush out of its compartment.
Now you have to clean the main brush thoroughly from end to end using the cleaning tool. You may use scissors to cut away hairs wrapped around the brush. Clean the end of the brush element and the compartment where the brush is held as well. When done, replace the end piece and insert the main brush’s square end into the square inside the brush compartment. Lastly, replace the screw securing the main brush. The side brush is also secured with one screw. Remove it and thoroughly clean the side brush as well as the socket where it is held. When done, replace the side brush and secure the screw.

Carpet Cleaning
The bObsweep PetHair uses infrared light to detect floors or edges in your house. Because darker carpet tends to absorb infrared light, it can sometimes seem like an edge to the robot. If the vacuum continually displays trouble “number 03” on its screen while it is working on dark carpeting, you may need to “blindfold” the robot.
Flip the bObsweep PetHair over and you will see 4 clear sensors near its bumper. Use the blindfold stickers that came with the vacuum to blindfold the robot. Peel off the backs of each blindfold sticker and place one onto each of the vacuum’s 4 sensors. Make sure each sensor is fully covered. Remember, the vacuum robot will not be able to detect stairs or edges now anymore.
bObsweep PetHair Virtual Walls
blOck, You can draw invisible, 10-foot-long boundaries with the blOck tool. Use blOck to customize your cleaning space, protect delicate furniture, or confine the robot vacuum to a single room. blOck runs on 4 AA batteries and to use blOck for the first time, you need to synchronize the tool with the robot vacuum.
Located on the back of blOck, just above its battery cover, are two buttons: on the left, the “On/Off” button, and on the right, the “Sync” button. First, flip the robot power switch to “Off”. Then, press blOck’s “On/Off” button, and the power light will turn on. Wait 10 seconds and it will slowly blink every 3 seconds.
This means blOck is “On” and ready to sync. Next, switch the robot vacuum power switch to “On” while at the same time pressing blOck’s sync button. The robot will beep twice to let you know the vacuum and the blOck tool are now synced. If you didn’t time the sync quite right, you may turn both Bob and blOck “Off” and begin again. To turn blOck “Off”, simply press the “On/Off” button again. The power light will blink and then disappears altogether.
blOck emits an invisible beam from its front. If you would like to block a doorway, place blOck on the edge of the doorway with the beam laid out across the doorway’s length. blOck will remain “On” for 3 hours before turning itself “Off” to preserve energy. The power light will flash more quickly than normal when blOck is in need of new batteries. To preserve battery, turn the blOck tool “Off” when not in use. If you would like to create multiple invisible boundaries within your home, you can pick up more blOcks on Amazon here.
Remote Control bObsweep PetHair
Direct the robot’s movements, adjust the speed, and select the cleaning modes through the multifunctional handheld remote. To use the remote for the first time, you may need to sync the remote with the robot vacuum cleaner. To do so you have to insert 2 AA batteries.
Next, hold down the “pause button” while at the same time flipping the power switch to “On”. The power button at the top of the remote puts the robot in standby mode, which conserves the battery and mutes the beeping. If you will not be using the vacuum for a while, it is best to switch the power to “Off”.
Below the power button are 4 directional arrows. Hold down any of the arrows to control the robot’s movements. The “pause button” in the center stops the vacuum. The 3 buttons on the left of the remote read UV, CORNERS, and AUTO. Press the “UV button” to turn the disinfecting UV lamp “On” or “Off”.
Press the “CORNERS button” and the vacuum will enter “Wall Track mode” and travel along the perimeters of your room. Press the “AUTO button” and the vacuum will switch to “Robot More” and it will clean in a default auto setting, returning to the docking station when it needs to recharge.
On the right side of the remote are the buttons SPOT, CHARGE, and SPEED. Press the “SPOT button” and the vacuum will target a small spill by driving in a gradually increasing circle. Press the “CHARGE button” to send the robot back to its charging station. If you would like the bObsweep PetHair to slow down or speed up, press the “SPEED button”. The bObsweep PetHair has 3 cleaning speed modes: low, medium, and high.
On the lowest speed, the vacuum will take longer to travel across large areas, but will clean more thoroughly; on the highest speed, the vacuum will work quickly and cover more of your house. The robot can detect its remote’s signal from any direction, so you can control the vacuum from wherever you are sitting. If you will not be using the remote for a long time, you should remove the batteries.
bObsweep PetHair Mop Attachment
The bObsweep PetHair holds its mop underneath the vacuum, between its left and right wheels. To install the mop attachment, hold it with its Velcro side up and its side tabs (circled) near the top. Press down until the mop attachment clicks into place. The mop attachment’s longer end should trail behind the vacuum as it cleans.
Dampen the mopping cloth with water and cleaning liquid before placing it on its mopping attachment. Due to its electrostatic properties, the microfiber cloth will be also picking up dust when drying. To uninstall the mop attachment, use both hands to gently press its tabs inwards and lift it up.
bObsweep PetHair Charging Station
To set up the charging station, you first have to plug the power adapter into the side of the station. The station’s screen will light up. You have to place the station on a hard, flat surface with at least 1 inch of space between its back and the wall. Make sure it is in an easily accessible location, with at least 10 feet of space to its front and 2 feet of space to its sides.
If you would like the robot vacuum to dock to its charging station, simply press the “Dock” button on the cover or the “Charge” button on the remote. You may also place the bObsweep PetHair directly on top of the station, with the metal plates on underneath lined up with the charging nodes on the station.
The bObsweep PetHair automatically returns to its charging station when the vacuum is at 15% battery life. If the station is in an inaccessible location, the bObsweep PetHair may run out of battery before the robot finds the charging station. When the battery is drained, the bObsweep PetHair will not respond to commands on the remote or cover buttons. To revive an unresponsive robot vacuum cleaner you have to unplug the power adapter from the station and plug it directly into the side, above the “On/Off” switch. The screen will light up, and the battery bars will flash as the bObsweep PetHair recharges.
The bObsweep PetHair will display the word “Ready” on its screen when the robot is fully charged. After that, the robot will have all the energy it needs to clean your house again. You may unplug the power adapter from the side and re-plug it into the charging station.
If the bObsweep PetHair continues to run out of battery before reaching the station, you may want to relocate the charging station to a more open area with plenty of room around it. Test the docking ability by placing the bObsweep PetHair directly in front of the charging station and press “Dock” on its cover, or “Charge” on the remote. The bObsweep PetHair can sit on the charging station for up to 5 days. After that, you should switch the vacuum “Off” to Conserve the battery life.
Cleaning Modes
The bObsweep PetHair is programmed to operate with just the push of a button, but the robot has several different settings and modes from which you can choose. It all depends on your particular cleaning needs. To select the auto settings, press the “Mode” button on the cover and you will see the word “Auto” lighting up on the screen. Press the “Program” button to browse through settings 1, 2, and 3. Press “Start” once you have found your desired cleaning mode.
Auto 1: Robot
Auto 1, or “Robot” mode, is the default auto setting and is appropriate for most situations. On this mode, the bObsweep PetHair covers a large area before returning to its charging station when the battery reaches 15%. You may also select “Robot mode” by simply pressing “Start” on the robot’s cover, or “Auto” on the remote.
Auto 2: Quick Clean
On “Quick Clean” mode, or “Auto 2”. The bObsweep PetHair cleans a medium-sized area for 30 minutes before going on standby to conserve battery life. Unlike in “Robot” mode, the bObsweep PetHair will not return to its charging station and will beep until you either switch power to “Off” switch or place the robot on the charging station.
Auto 3: Touch Up
Use “Touch Up” mode, or “Auto 3”, to make the robot vacuum dash across a small area for 15 minutes. This mode is perfect for when you are on the go. As in “Quick Clean” mode, the bObsweep PetHair will go on standby rather than returning to its charging station when it is done the cleaning.
In addition to these auto settings, the bObsweep PetHair has 3 specialized cleaning movements: “Spiral Track”, “Waffle Track”, and “Wall Track”. Press the “Mode” button twice and the word “Spot” will light up on the screen. Press “Program” to select either “Spot 1” or “Spot 2”. Press “Play/Pause” to confirm your selection.
Spot 1: Spiral Track
Select “Spot 1” for Spiral Track. In this mode, the vacuum will spin in gradually widening circles for 1 to 4 minutes. You may also select “Spiral Track” by pressing the “Spot” button on the remote.
Spot 2: Waffle Track
Spot 2 indicates “Waffle Track”. The bObsweep PetHair will travel across a small area in a grid pattern for 1 to 4 minutes.
Wall Follow/Wall Track
Press “Mode” 3 times to enable “Wall Follow”. Press the “Start” button and the bObsweep PetHair will enter “Wall Track” mode. The robot vacuum will sweep along the perimeters of your room for approximately 10 minutes. You may also select this mode by pressing the “Corners” button on the remote.
The bObsweep PetHair’s various auto settings are designed to tackle all cleaning challenges and room sizes. Experiment with the different settings in your home and see which ones work best in your house.
Custom Cleaning Schedule
Want the bObsweep PetHair to clean even when you are not at home? Set a schedule on the charging station and the robot vacuum will automatically clean on the day and time of your choosing. The bObsweep PetHair will return to its charging station to refuel its energy when done.
To customize the vacuum to your schedule, you will first need to set the current time and day on the charging station. Plug the charging station into the wall and press the power button. The display screen will light up. Next, press the clock button to the right side of the display. Press the clock button again and the minute/hour digits will light up.
You may now select the current minutes/hour using the “plus button”. The bObsweep PetHair works on a 24-hour clock, so schedule accordingly. To set the hour/minutes, press the clock button once more. As with the minutes/hour, use the plus button to select the appropriate number. Press the clock button one last time to set the day of the week. Again, use the “plus button” to scroll through each option until you have reached the desired weekday.
Now that you have set the current time and weekday, press the “GO” button to the left of the display to save your settings. You are now ready to set a weekly cleaning schedule. Press the “bell button” to the right of the display and the minute digits will light up.
Select the desired minute by using the “plus button”. Press the bell button once more and the “hour digits” will light up. As before, use the “plus button” to select the desired hour. Press the “bell button” again and you will see the Sunday icon light up.
If you would like the bObsweep PetHair to clean on the selected weekday, wait until the icon stops lighting up. Then press the plus button to move on to the next weekday. If you would like to bypass a day on the cleaning schedule, press the “plus button” while the weekday icon is still lighting up.
To save your settings, press the “GO” button to the left of the display. You may reset the cleaning schedule and restore to the default settings by unplugging the charging station.
bObsweep PetHair Troubleshooting
Normally the bObsweep PetHair Robotic Vacuum Cleaner doesn’t need help cleaning your home, but sometimes it encounters challenges that you can help to overcome. The robot vacuum cleaner identifies what the issue is and communicates it with you by displaying the corresponding trouble number or error code on the screen.
Trouble number 00: Left Wheel
Trouble number 00 means an object is lodged in the left wheel. Check the space around the wheel for any debris, then clean it out with the cleaning tool or compressed air.
Trouble number 01: Right Wheel
Trouble number 01 refers to a jam in the right wheel. As with the left wheel, clear the space around the wheel using compressed air or the cleaning tool. If this does not solve the problem and the robot still shows “Trouble Number 01”, perform a checkup test to see how the wheels respond to the test.
Trouble number 02: Main Brush
Trouble number 02 means the main brush is unable to move freely. Flip the vacuum over and remove the main brush with a screwdriver. Give it a good clean from end-to-end. Use scissors to snip out any tangled threads, wires, or strands of hair. Clean the brush compartment and end pieces as well before returning the main brush to its place.
Trouble number 03: Front Wheels
Trouble number 03 concerns the front wheel, where there may be a blockage. Check the spokes of the wheel and empty the space around the entire socket. Remove congestion using compressed air or the cleaning tool.
Trouble number 04: Ground Detecting Sensors
Trouble number 04 indicates dirt covering the vacuum’s 4 ground detecting sensors. Wipe the sensors using a clean, dry cloth or fling away particles with a quick burst of compressed air. If the bObsweep PetHair continues to display this trouble number while working on dark-colored floors, that means the floor has absorbed all its infrared detection signals and is tricking the vacuum into thinking there is no ground beneath it.
In this case, you may need to blindfold the robot using the blindfold stickers included in the package. Peel the backs off of the vacuum’s blindfold stickers and place them on each of its 4 sensors so that they are completely covering the sensors. While blindfolded, the vacuum will be unable to detect stairs or sharp edges.
Trouble number 05: Wall Sensors
Trouble number 05 tells you when the residue is blocking the wall sensors. Simply wipe the surface clean with a dry cloth. Double check to make sure nothing is trapped underneath the bumper.
Trouble number 06: Touch Sensors
Trouble number 06 means the bumper has caught rogue bits of debris between its walls. Gently tap on the bumper to dislodge any dirt, or use the cleaning tool and compressed air to brush through the curved crevice until it is clear.
Trouble number 09: Main board
Trouble number 09 lets you know that the main board is not working properly. Contact the bObsweep customer care center if you encounter this issue.
Trouble number 10: Power System
Trouble number 10 means the vacuum is experiencing a power issue. Check the bObsweep PetHair for any of the following issues:
– The battery has absolutely no power left. What to do? Plug the vacuum directly into the wall and allow it to charge for a few hours. If the problem persists, move to the next step.
– The battery connectors are loose. What to do?? Open the battery compartment and check the battery connectors for any disconnect or loose connection.
If trouble number 10 appears as soon as the bObsweep PetHair automatically docks on its charging station, or when manually placed on the station, the issue can be either of the following:
– The charging station is not working. What to do? To test the station, plug the bObsweep PetHair directly to its adapter for charging. If this solves trouble 10, the vacuum needs a new charging station. If the issue persists after manual recharging and checking the battery connection, it is likely that the adapter is the cause for the issue. What to do? The bObsweep PetHair needs a new charging adapter. If you have a measuring device in hand, check to see if the current of the adapter is above 0.6 Amperes.
bObsweep PetHair Robotic Vacuum Cleaner Infographic

Share this Infographic On Your Site
If you have any questions or comments, please add them below in the comment section. Similarly, please let us know if you spot any mistakes or omissions. Thanks!